Making tempeh without using plastic bags
Noni - Tempehtation • November 26, 2019
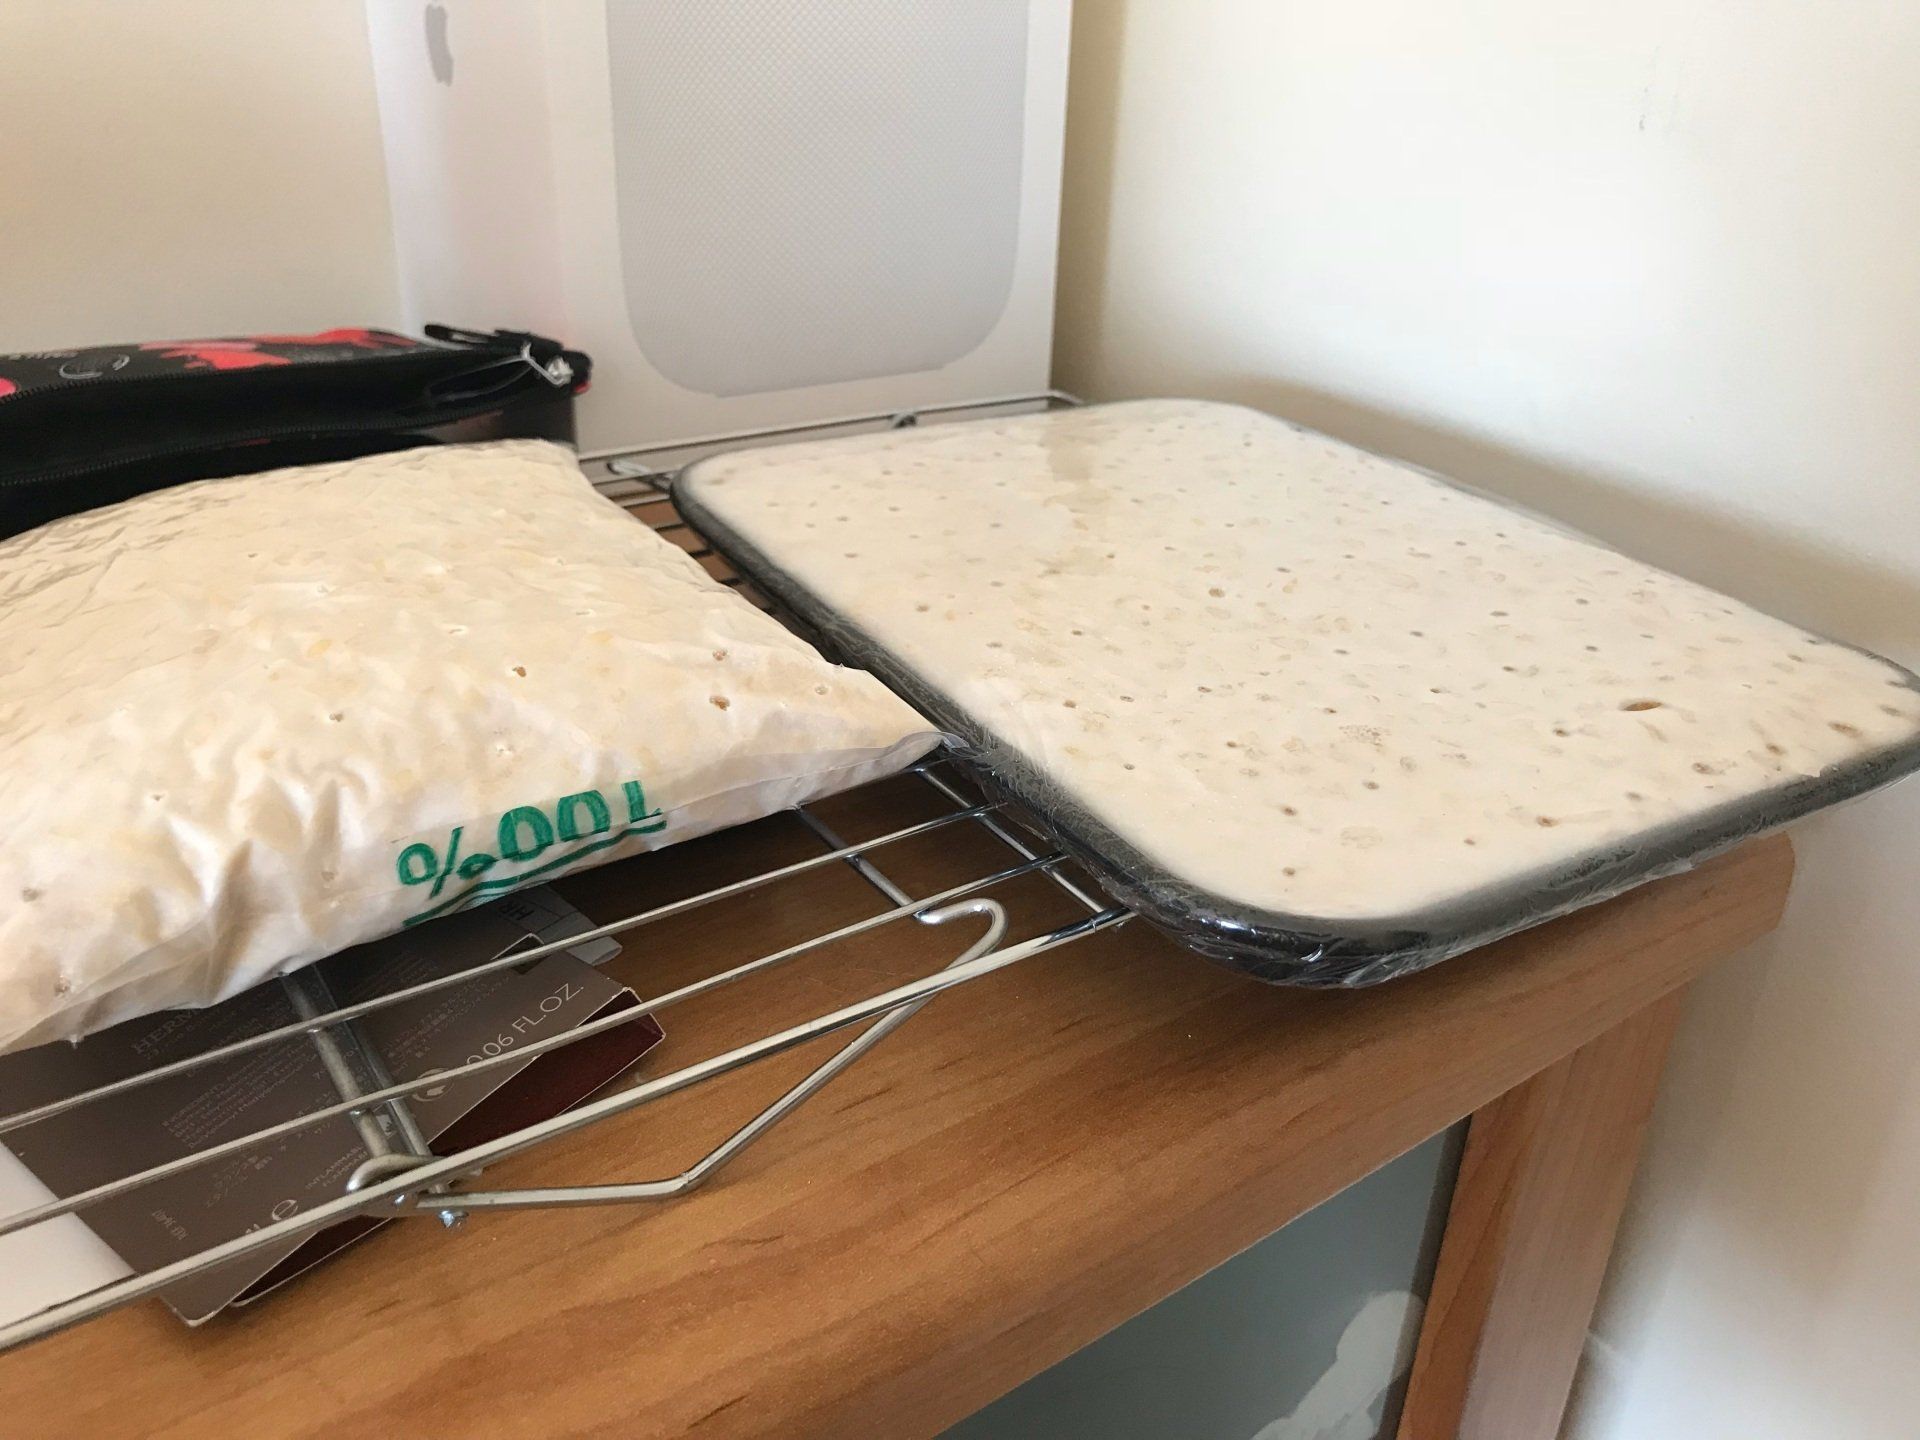
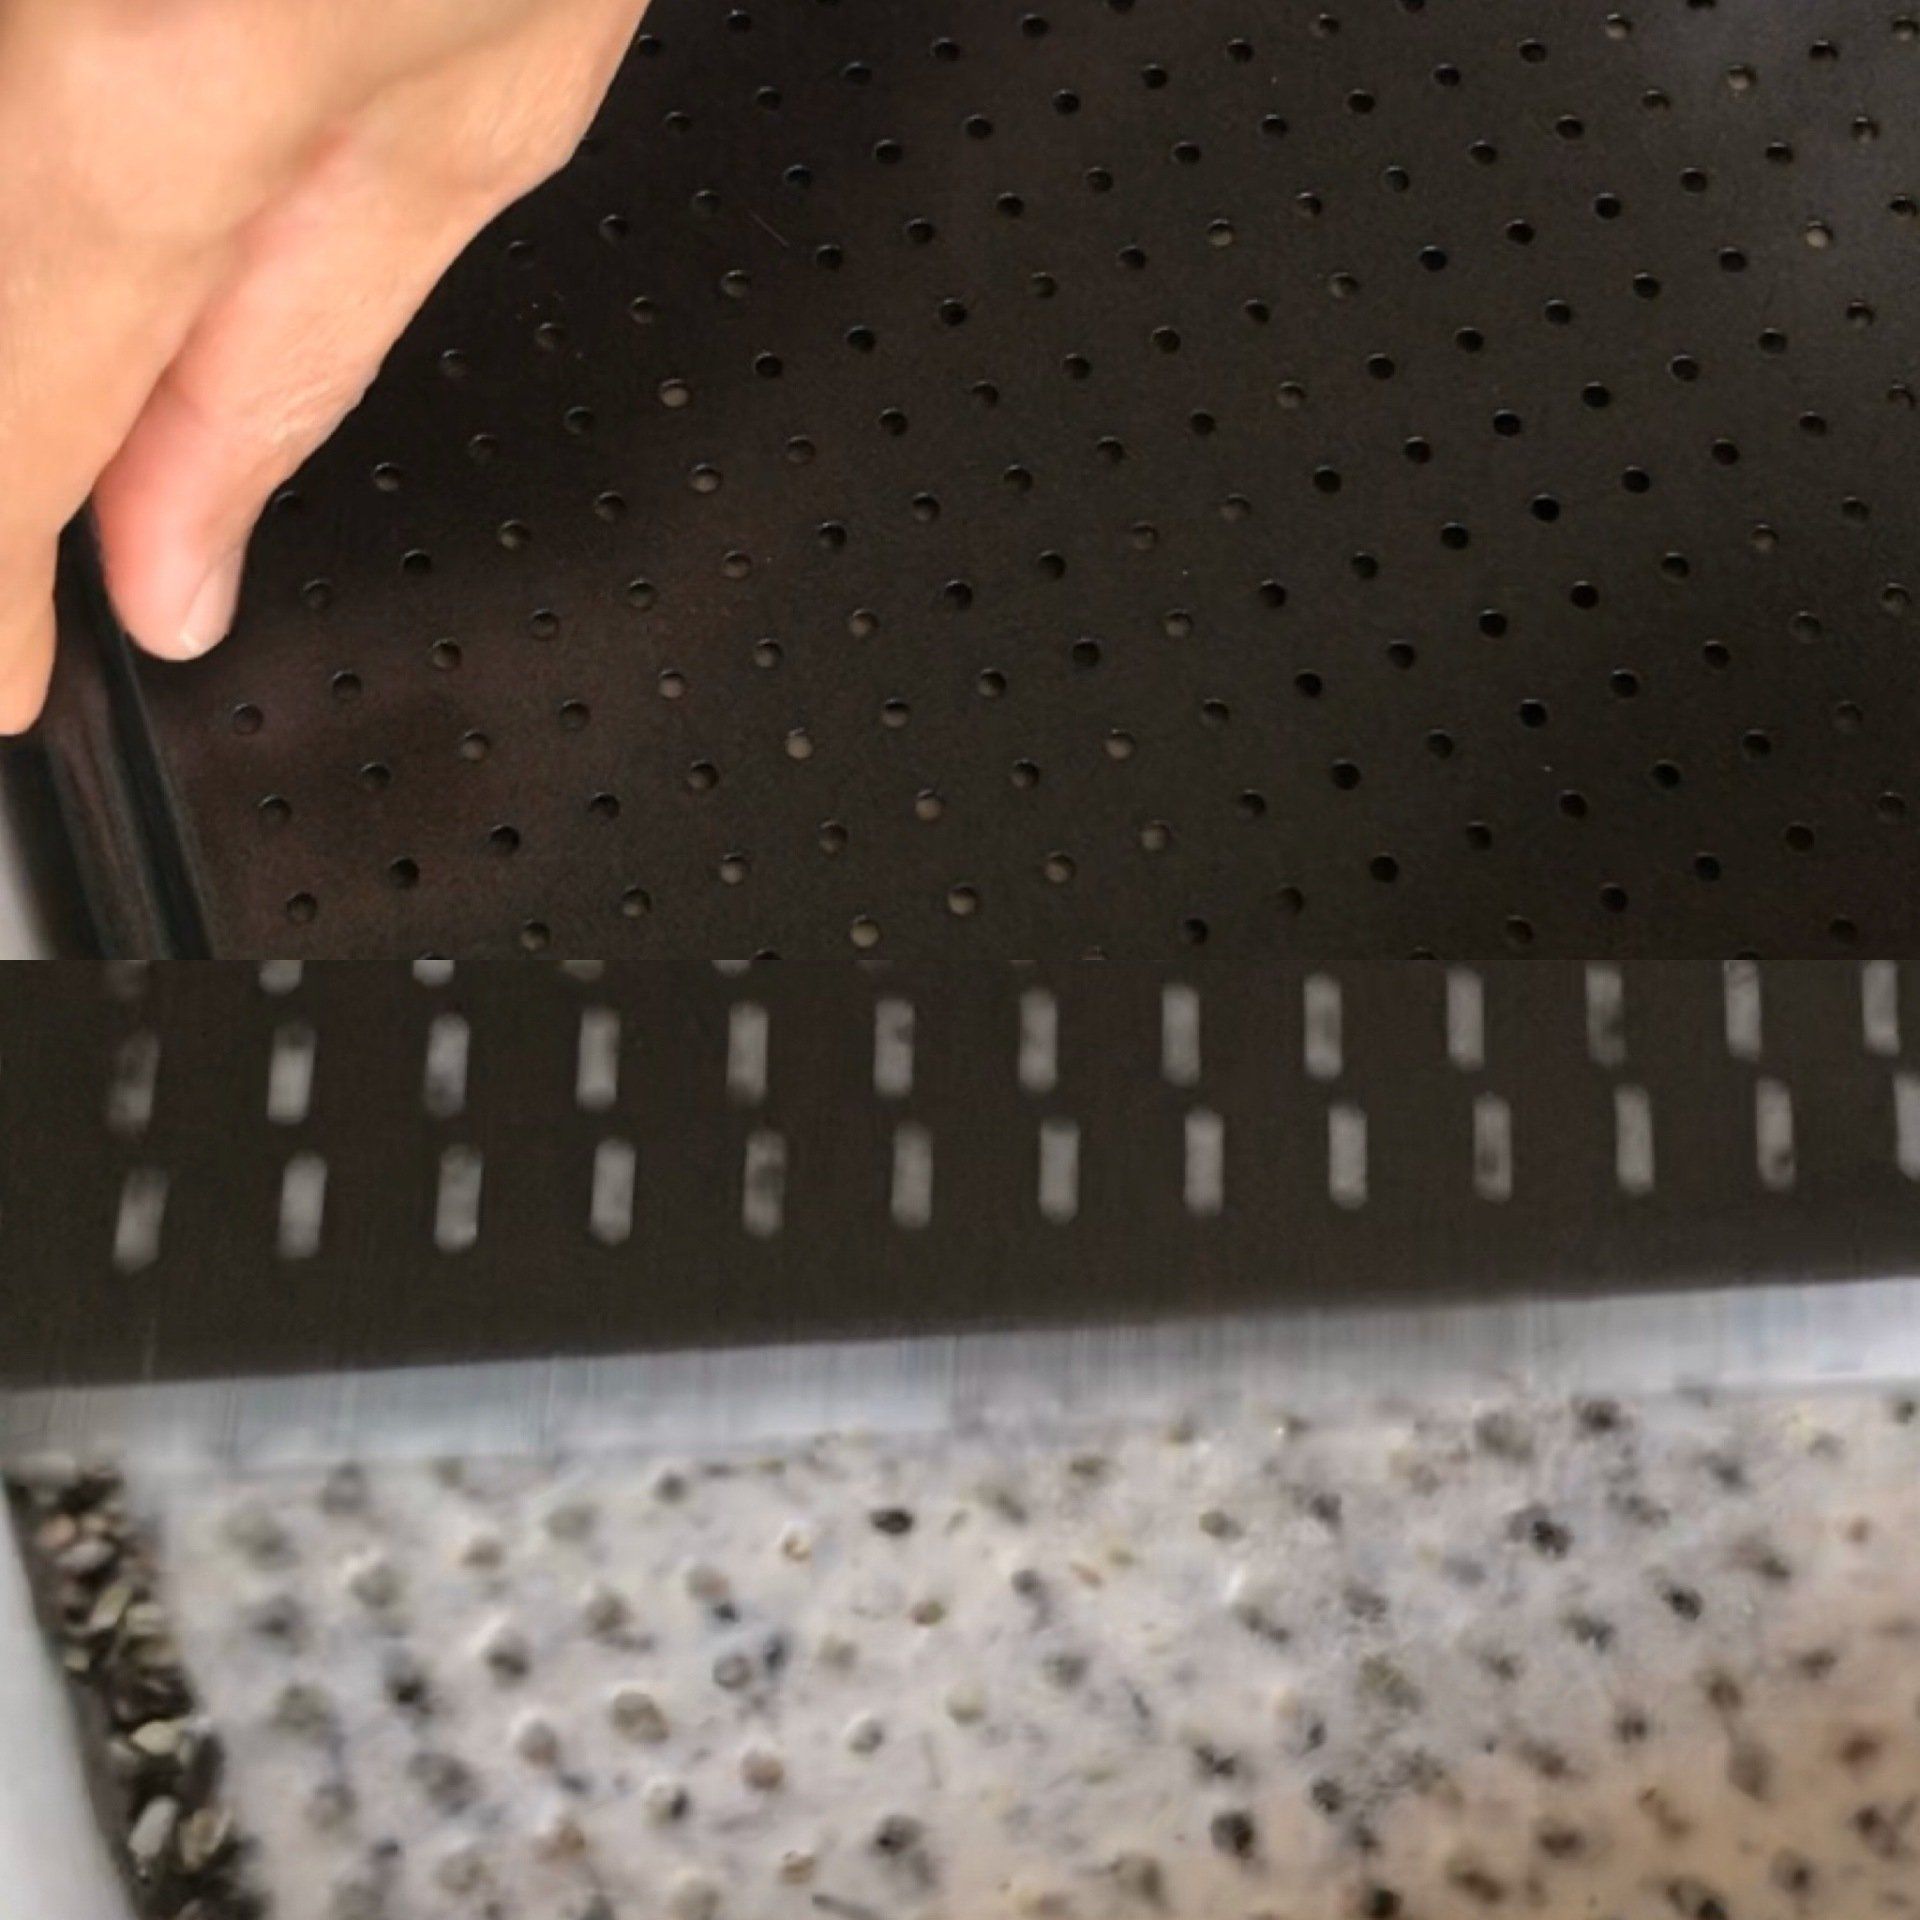
For the batch on the right I use Kitchen Craft non stick pizza baking tray with holes (this can be bought on Amazon UK). I wrapped the top of the tray with cling film to secure the beans and then pierced this with some holes for air circulation. Incubate as per tutorials.
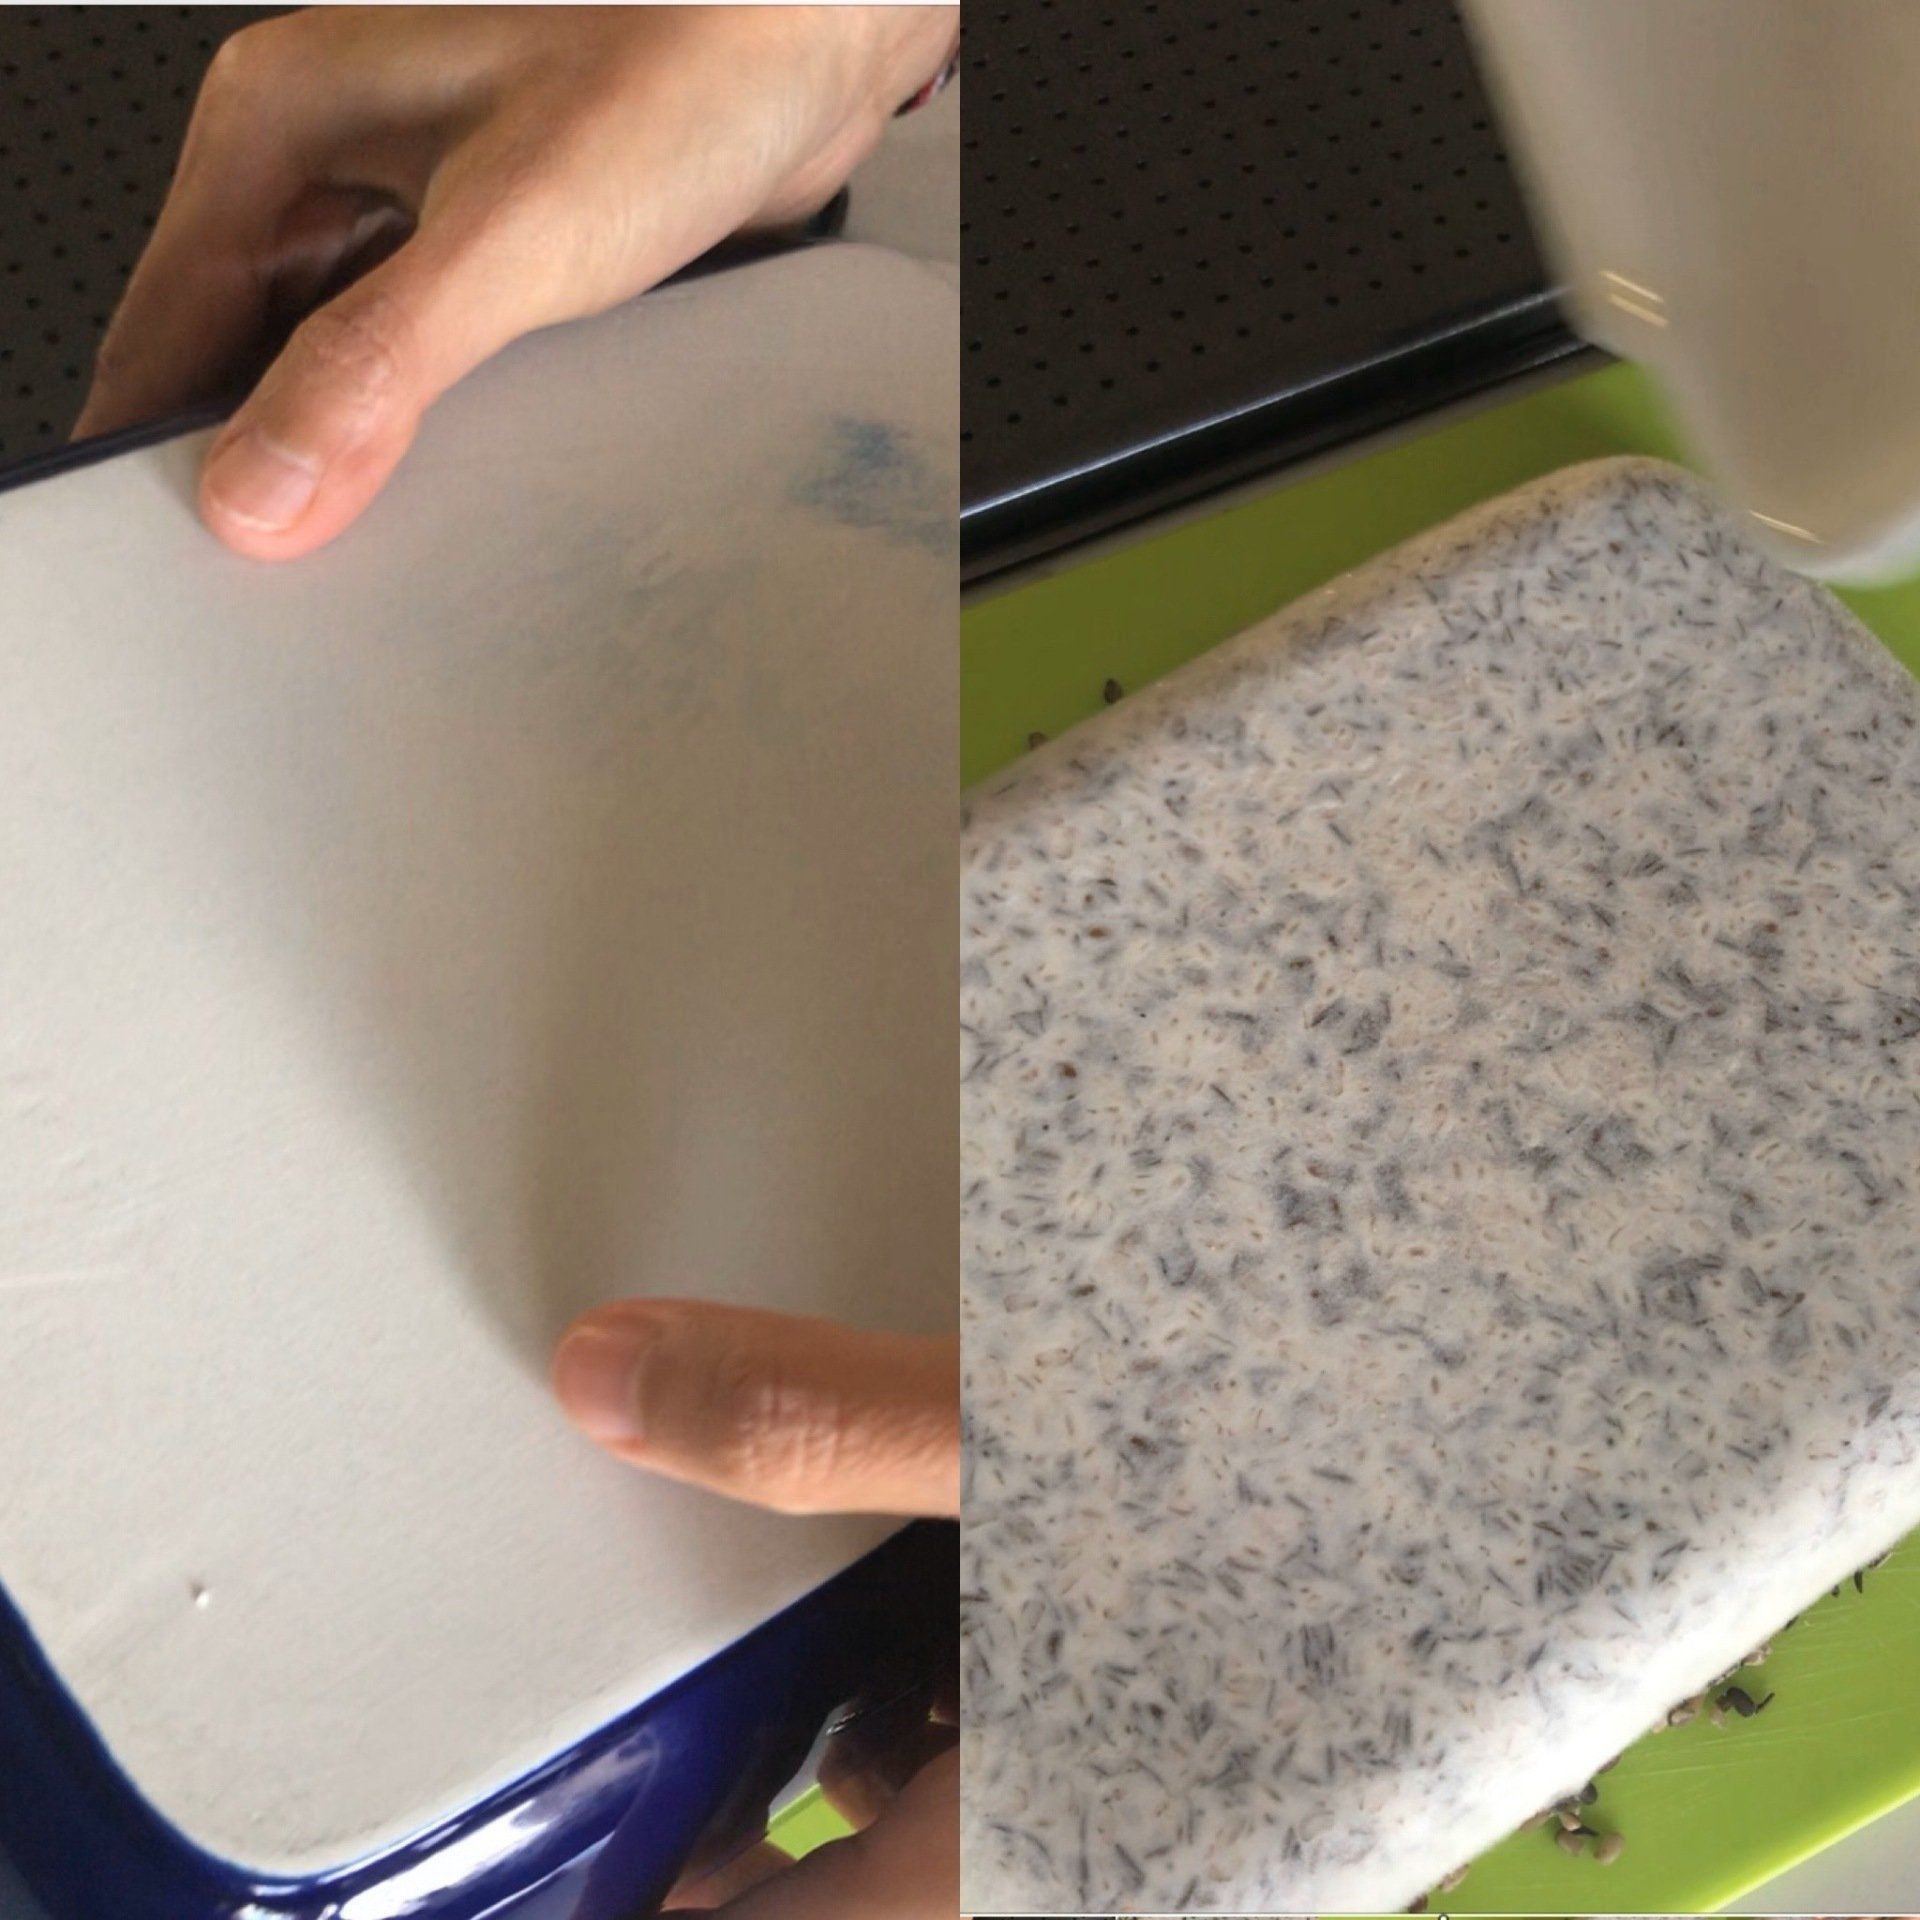
I used a ceramic baking tray for the above. It is important to press the beans down to ensure a compact shape. Then cover with a clean pizza baking tray with holes or cling film. If using cling film you must pierce this to allow air circulation. Then incubate as usual.
When the tempeh is ready, carefully lift the cover. You can see from the photo on the left that the beans are fully fermented and it is now a solid piece of tempeh. Carefully turn the baking tray upside down, let the tempeh slide down then slice some pieces and start cooking.
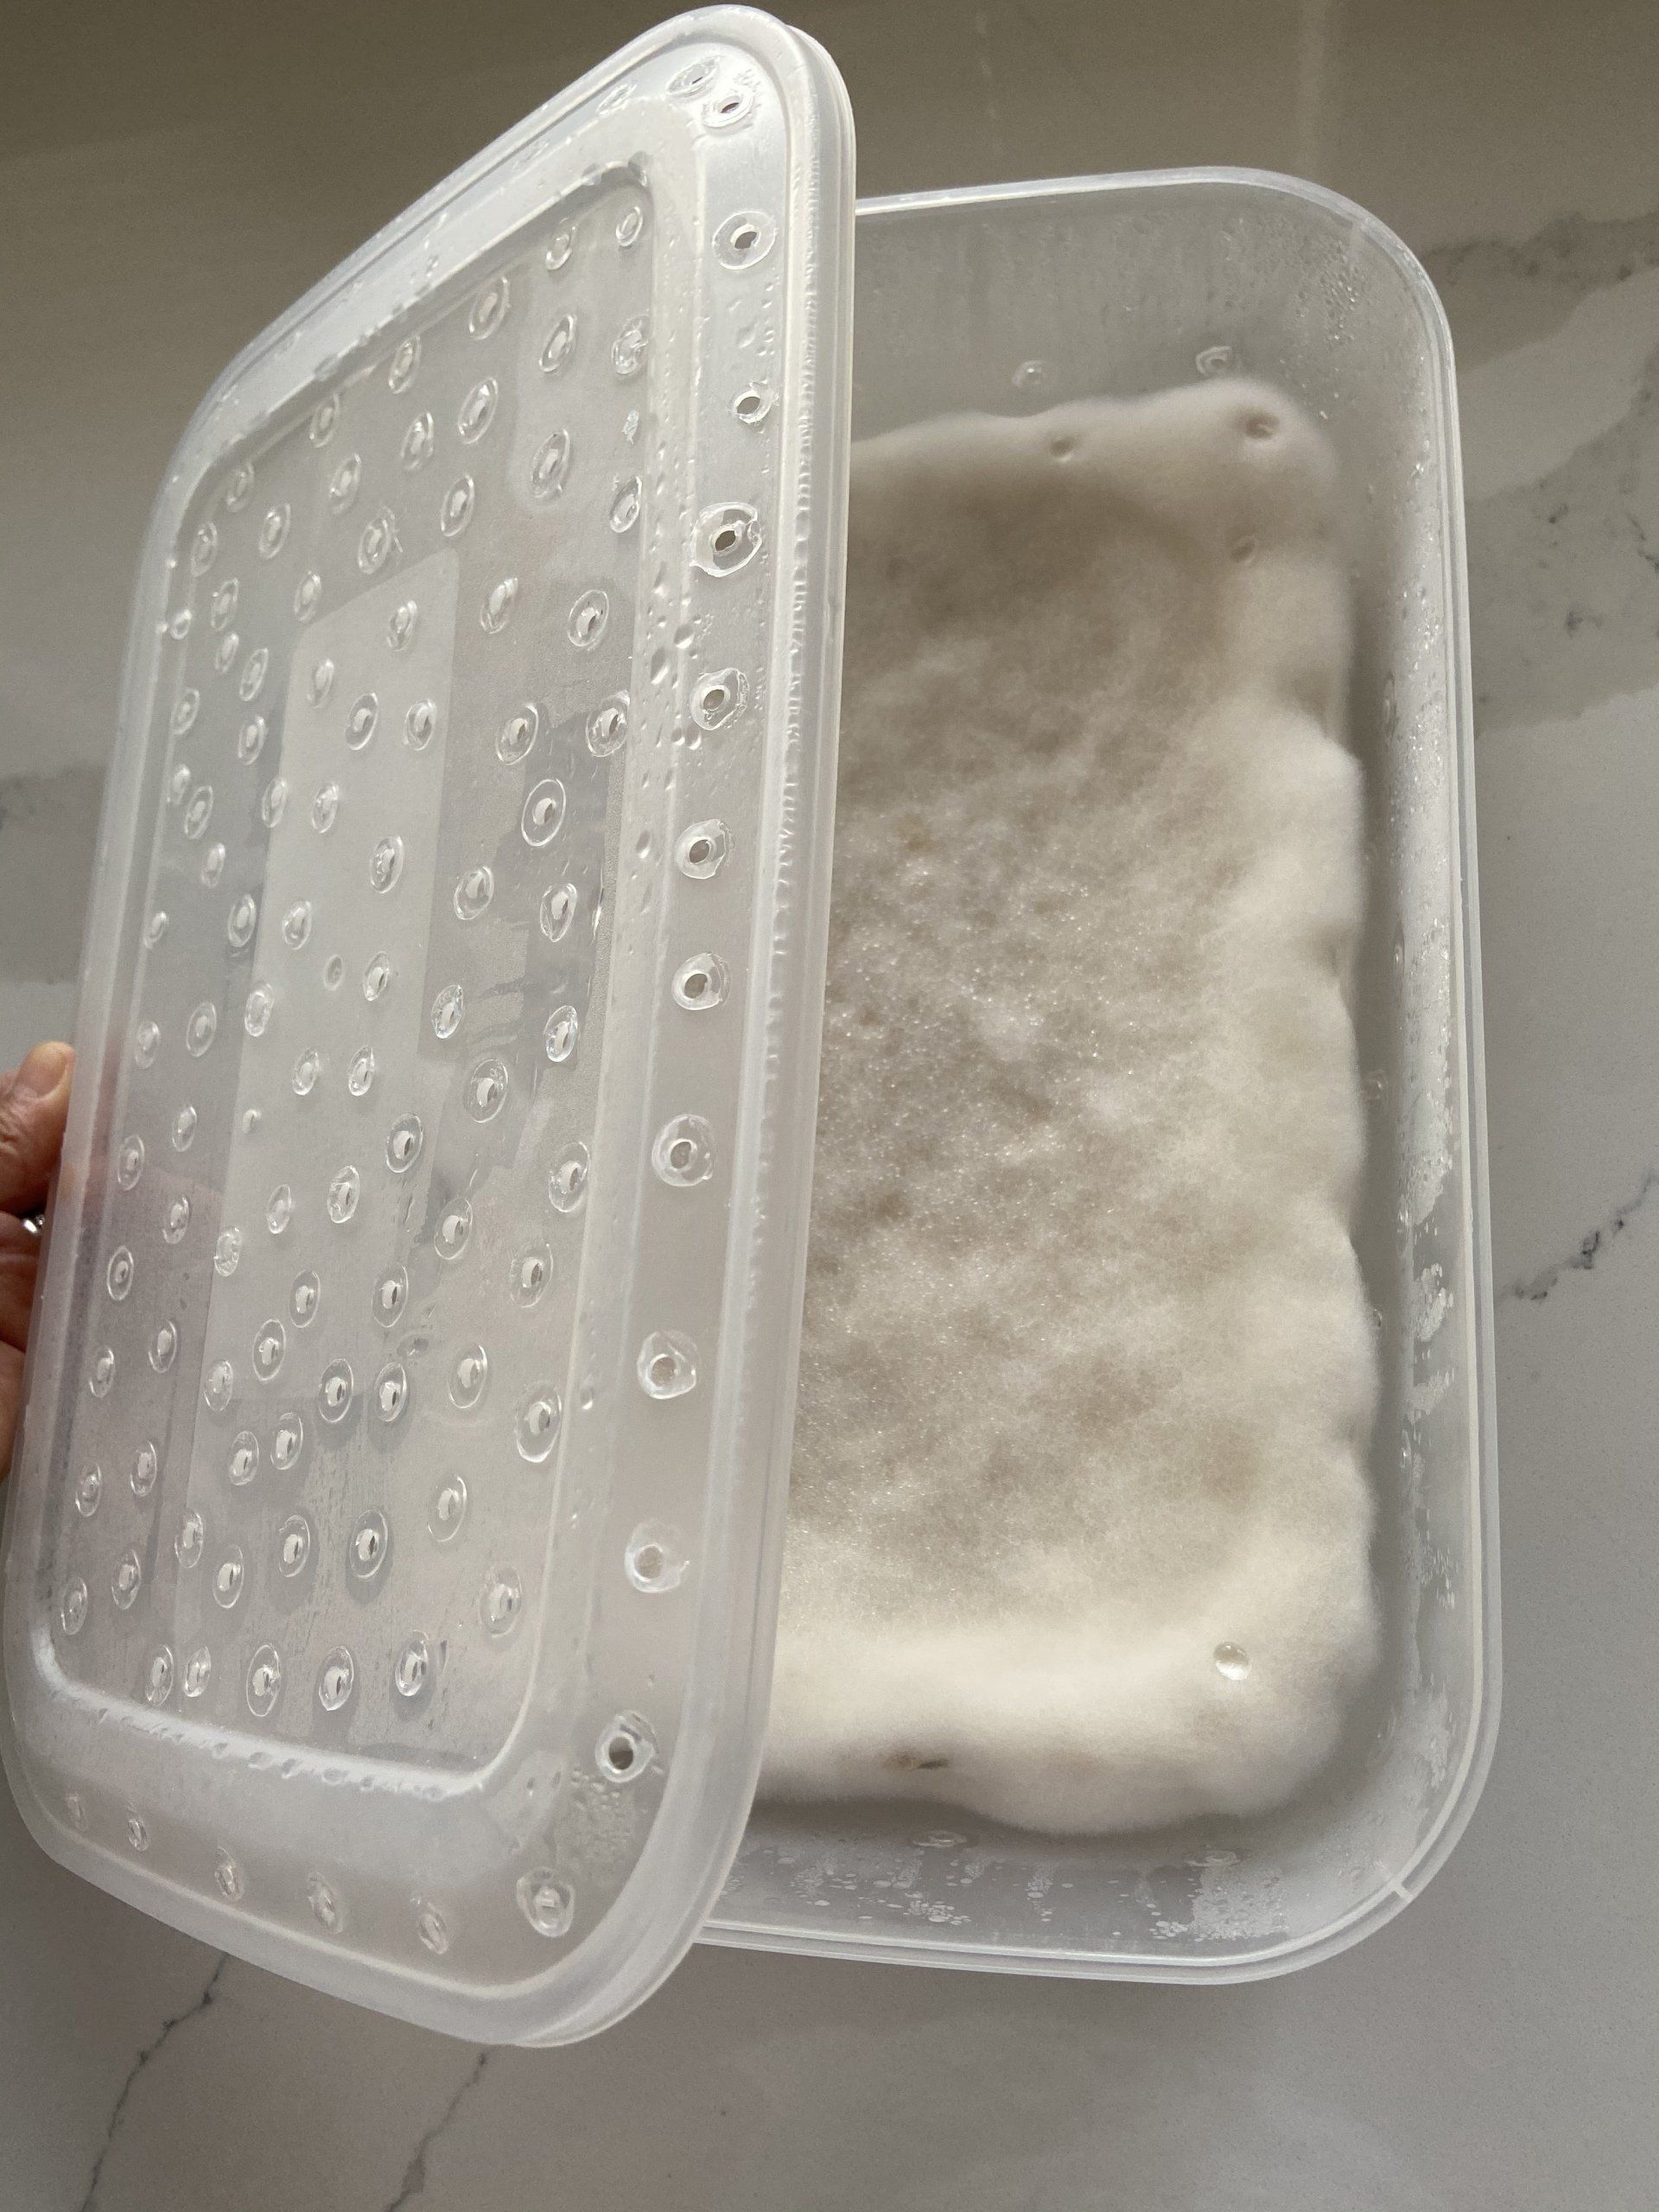
For the above method I used my old soldering iron to make holes in the Tupperware and lid. Alternatively you could use an electric drill. You can see from the picture that the fermentation has completed when the beans are covered with cotton-like white tempeh mould. Lift the lid very carefully before wiping off the heavy condensation on the lid and on the inside of the box.
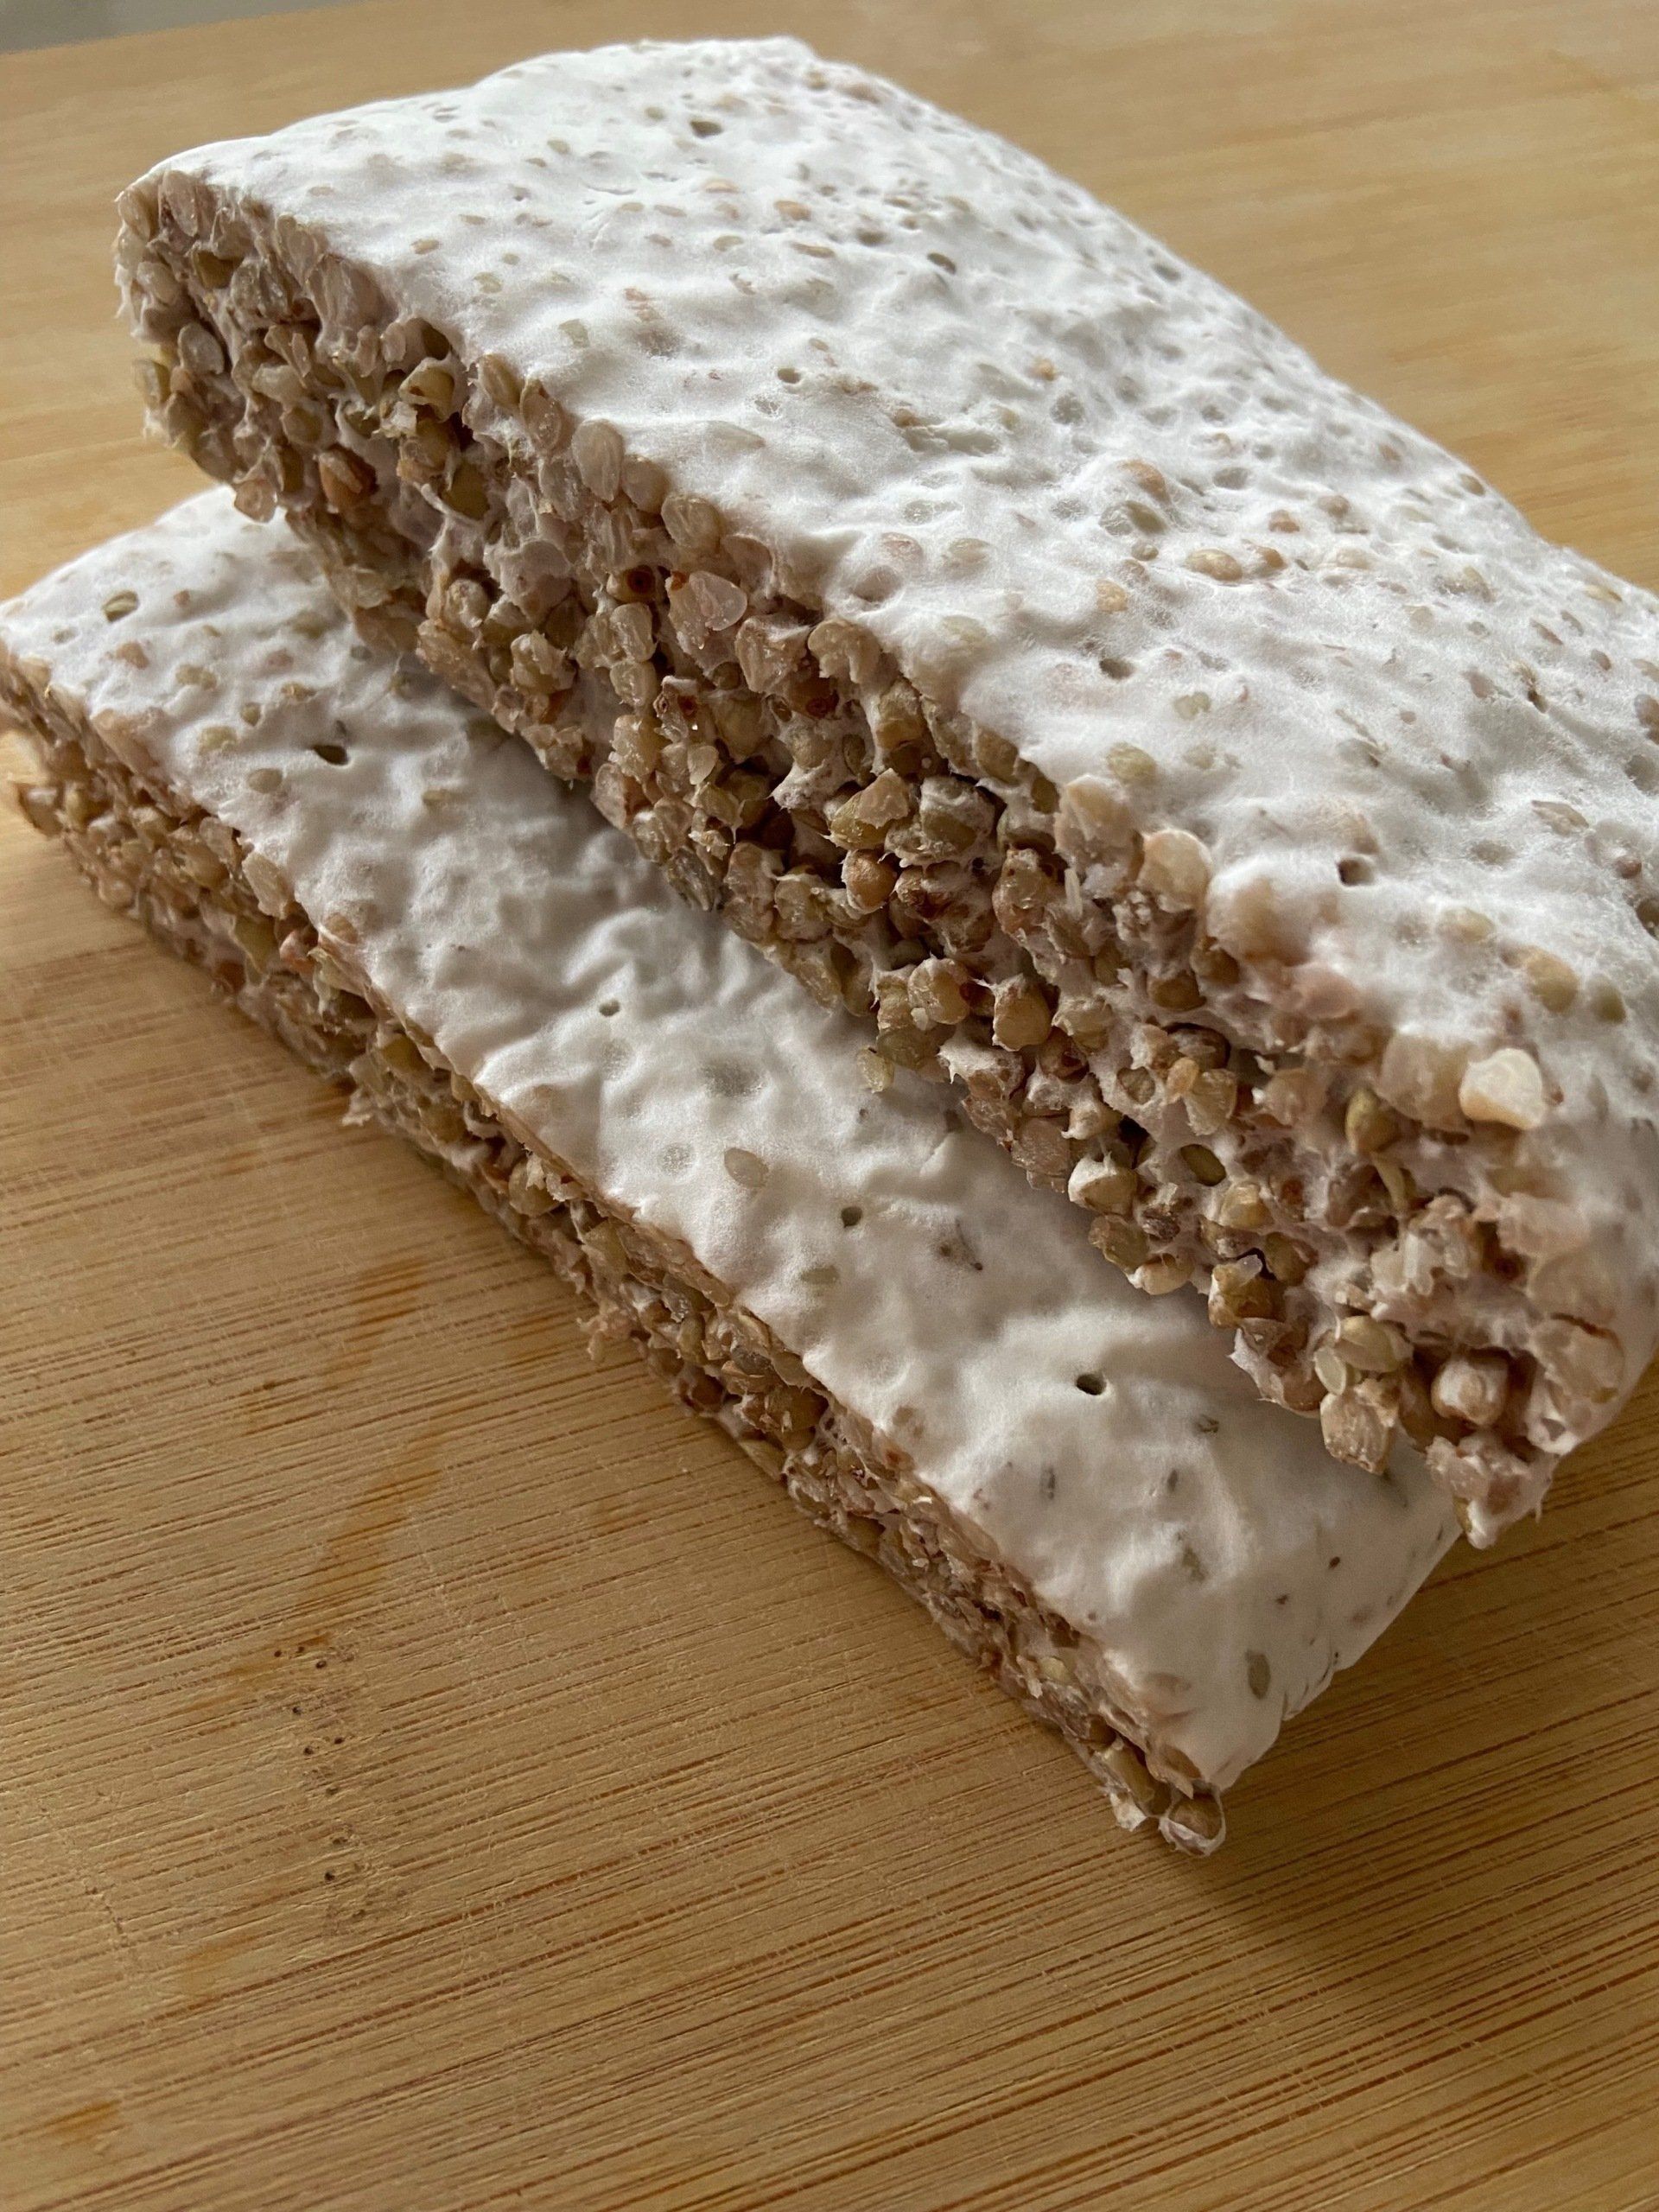
We experimented with organic buckwheat and we love it! There's no need to dehull and only took two minutes of steaming in an Instant Pot. Link to the YouTube tutorial is below. Ingredients: 200 grams of organic buckwheat 2 tablespoons of vinegar (can be sprayed or boil with the buckwheat) 1/2 teaspoon of Tempehtation starter water for steaming or boiling Incubator of your choice. How to: Follow the instructions in the video.
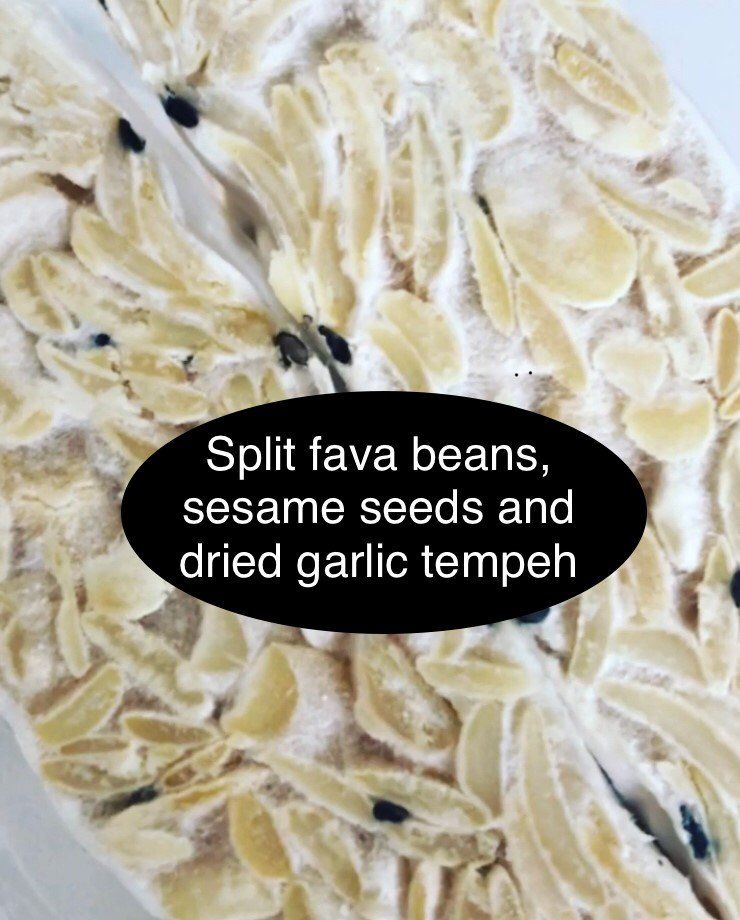
PLEASE NOTE: this tutorial is for colder countries where the temperature in your house is no more than 22C. If your room temperature is above 27C, there is no need to cover the beans with tea towels or electric blanket. Just leave the batch in a safe place. How do I know when the house is around 27C? If I walk around the house in a tank top and all the windows are open. I made another visit to my local Asian shop and bought several bags of beans that I'd never heard of. This turned out to be another easy to make tempeh, vall dall sweet or split fava beans (according to Google). Cooking time was only 9 minutes (using an induction hob) after soaking overnight. Then after inoculating the beans (please use the tempeh starter according to the instruction on the label), I added black sesame seeds to contrast with the pale kernels along with some dried chopped garlic for flavour. You can only add dried herbs or spices that you like as long as they are not oily. Fresh herbs may interfere with the fermentation. It was very cold and windy in Scotland when I made this so I had to use an electric blanket. It turned out so beautiful and delicious! The sesame seeds add a lovely crunch to the tempeh. Give it a try, you won't be disappointed!
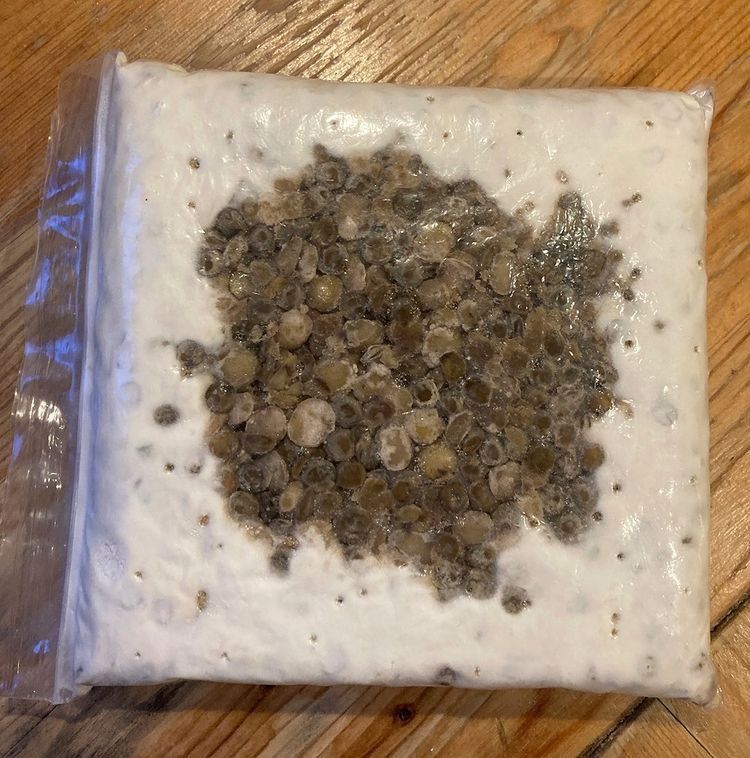
The above tempeh from Pam was fermenting perfectly but was either left in the incubator for too long resulting in overheating or the incubator was too hot. We suggest choosing an ambient temperature around 26C-28C from the beginning. A steady warm temperature is preferable to a high direct temperature of around 30C-34C unless you have experimented using a high temperature and understand the timings.
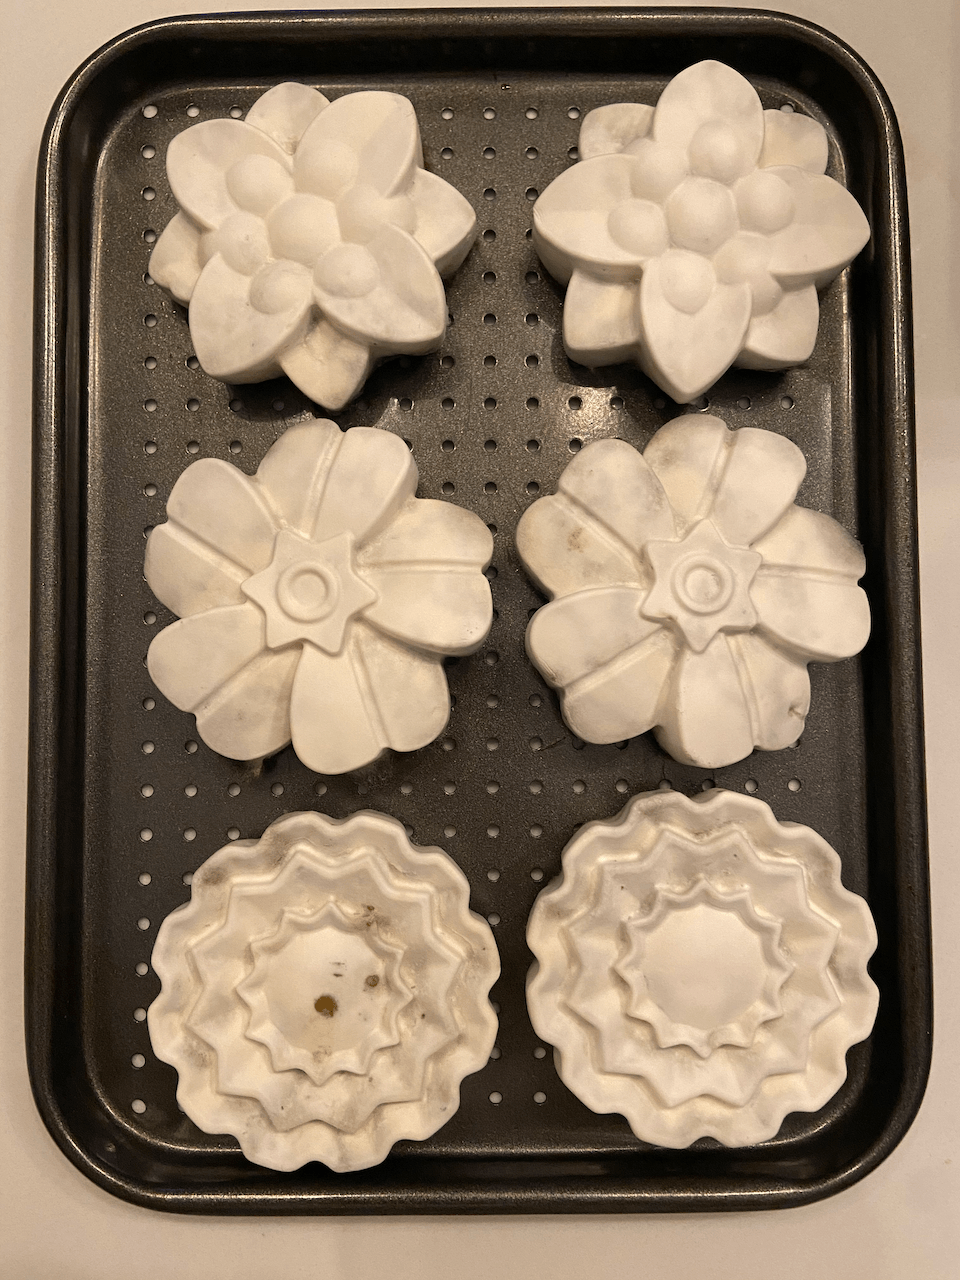
I became obsessed with sprouts after I've read that it helps to rebalance our hormones. If you have had a surgery that perhaps caused by hormone imbalance and a lifetime of bad food choices it is time to pay back your health with nutritious food. I have finally mastered making tempeh with sprouts, especially lentil sprouts (I had a 50kg sack of lentils so had plenty to practice with!). I had a few failed attempts before realising that I had to cook the sprouts for it to work. I wanted to retain as much vitamin C as possible but that actually stopped the tempeh spores from growing. The solution was to steam the lentils for 2 minutes in an Instant Pot. This won't overcook them and hopefully retain their beneficial vitamins. I also added some leftover chana dal as I knew that this has worked well in the past. If you decide to sprout other types of beans or lentils, adjust the steam time according to the kernel size. For example if you sprout yellow peas then you may need to steam them for 5-6 minutes in the Instant Pot. Now let's get cooking! Ingredients: 100 grams of sprouted lentils (steamed for 2 minutes) 100 grams of cooked chana dal (steamed for 20 minutes) 1 teaspoon of tempeh starter 2 teaspoons of rice flour A splash of white vinegar Equipment: Instant Pot if you have one, or use a steamer Clean utensils and a bowl A clean tea towel to spread the cooked sprouts and chana dal. Spread them out to dry at room temperature A clean silicon mould or a clean glass dish with lid (I don't use plastic bags anymore to make my tempeh) Incubator (we use a reptile mat or an electric blanket. Check our link here for other types of incubator) Digital thermometer Extra clean blankets or tea towels Process: Please check our video below. Step by step written process to follow
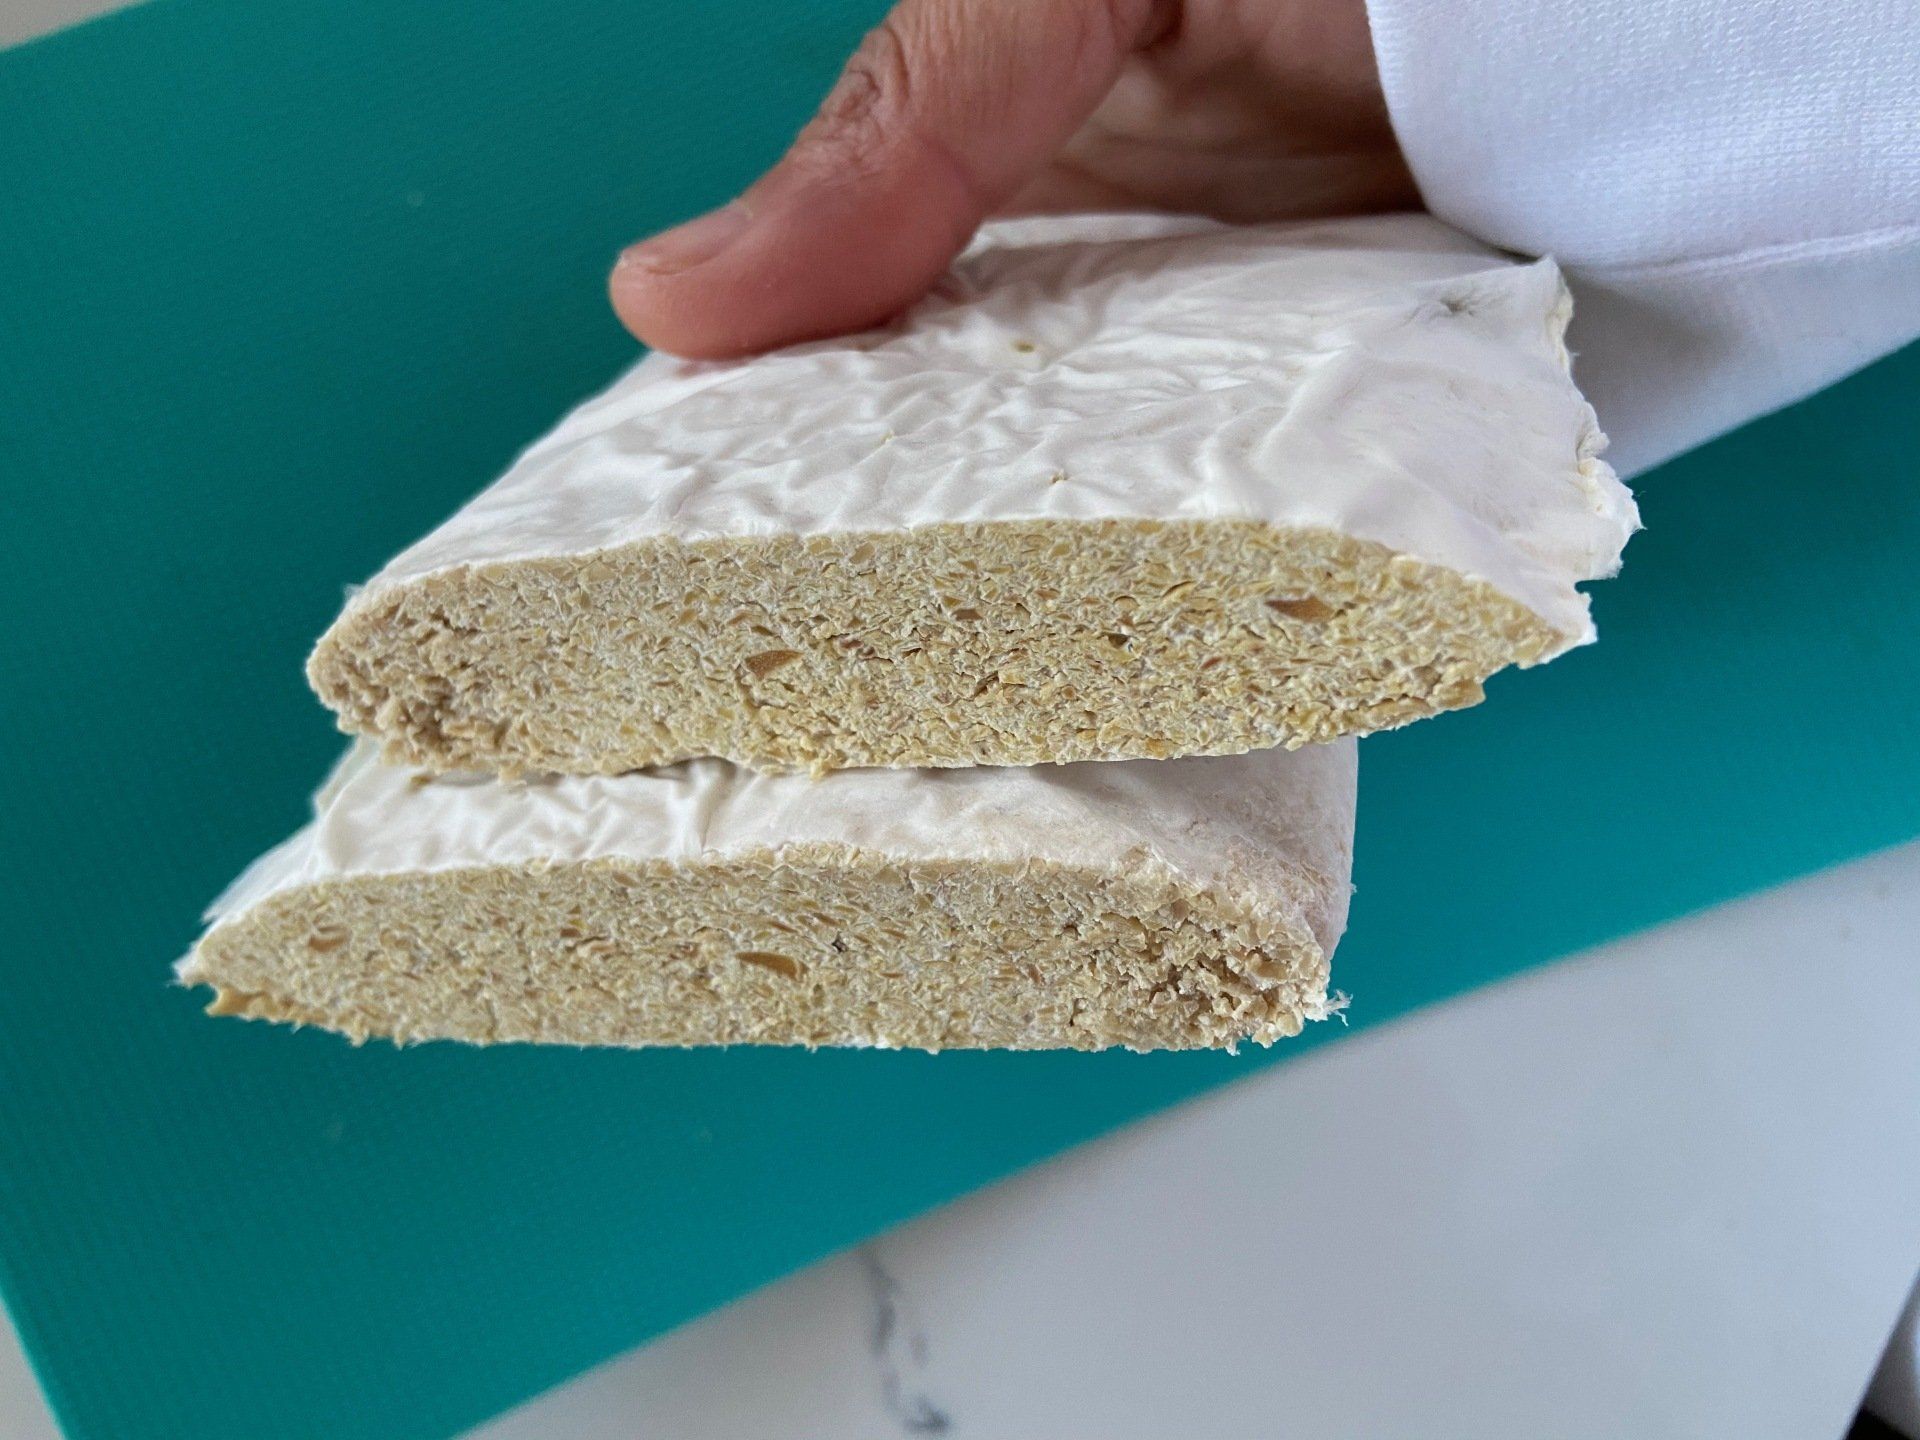
Most of you are probably wondering, what exactly is okara? Well according to Wikipedia, okara is a pulp consisting of insoluble parts of the soybean that remain after pureed soybeans are filtered in the production of soy milk and tofu. However in simple terms okara is really just powdered soya beans. Okara tempeh is a great way to recycle your soya waste from homemade soya milk. The finished tempeh is still as nutritious and delicious as ever. The texture is softer than ordinary soya tempeh, but it still ferments beautifully. I suggest slicing your okara tempeh into small cubes, spraying with a little garlic oil and popping them into the air fryer. The crispy tempeh is then perfect to throw into some stir fried noodles with hoisin sauce. I sometimes drop them into a noodle soup to add a bit of texture. If you have any recipes you are welcome to share in our Instagram. Now let's get cooking! Ingredients: 300 -400 grams of okara 1 tablespoon of rice flour 2 teaspoons of tempeh starter A splash of white vinegar Equipment: A large clean pan to boil the okara or a large clean wok with lid Clean utensils A clean bowl to transfer the cooked okara A food safe plastic bag that has been pierced with a stick or a large needle Incubator (we use a reptile mat or an electric blanket) Digital thermometer Clean blankets or tea towels
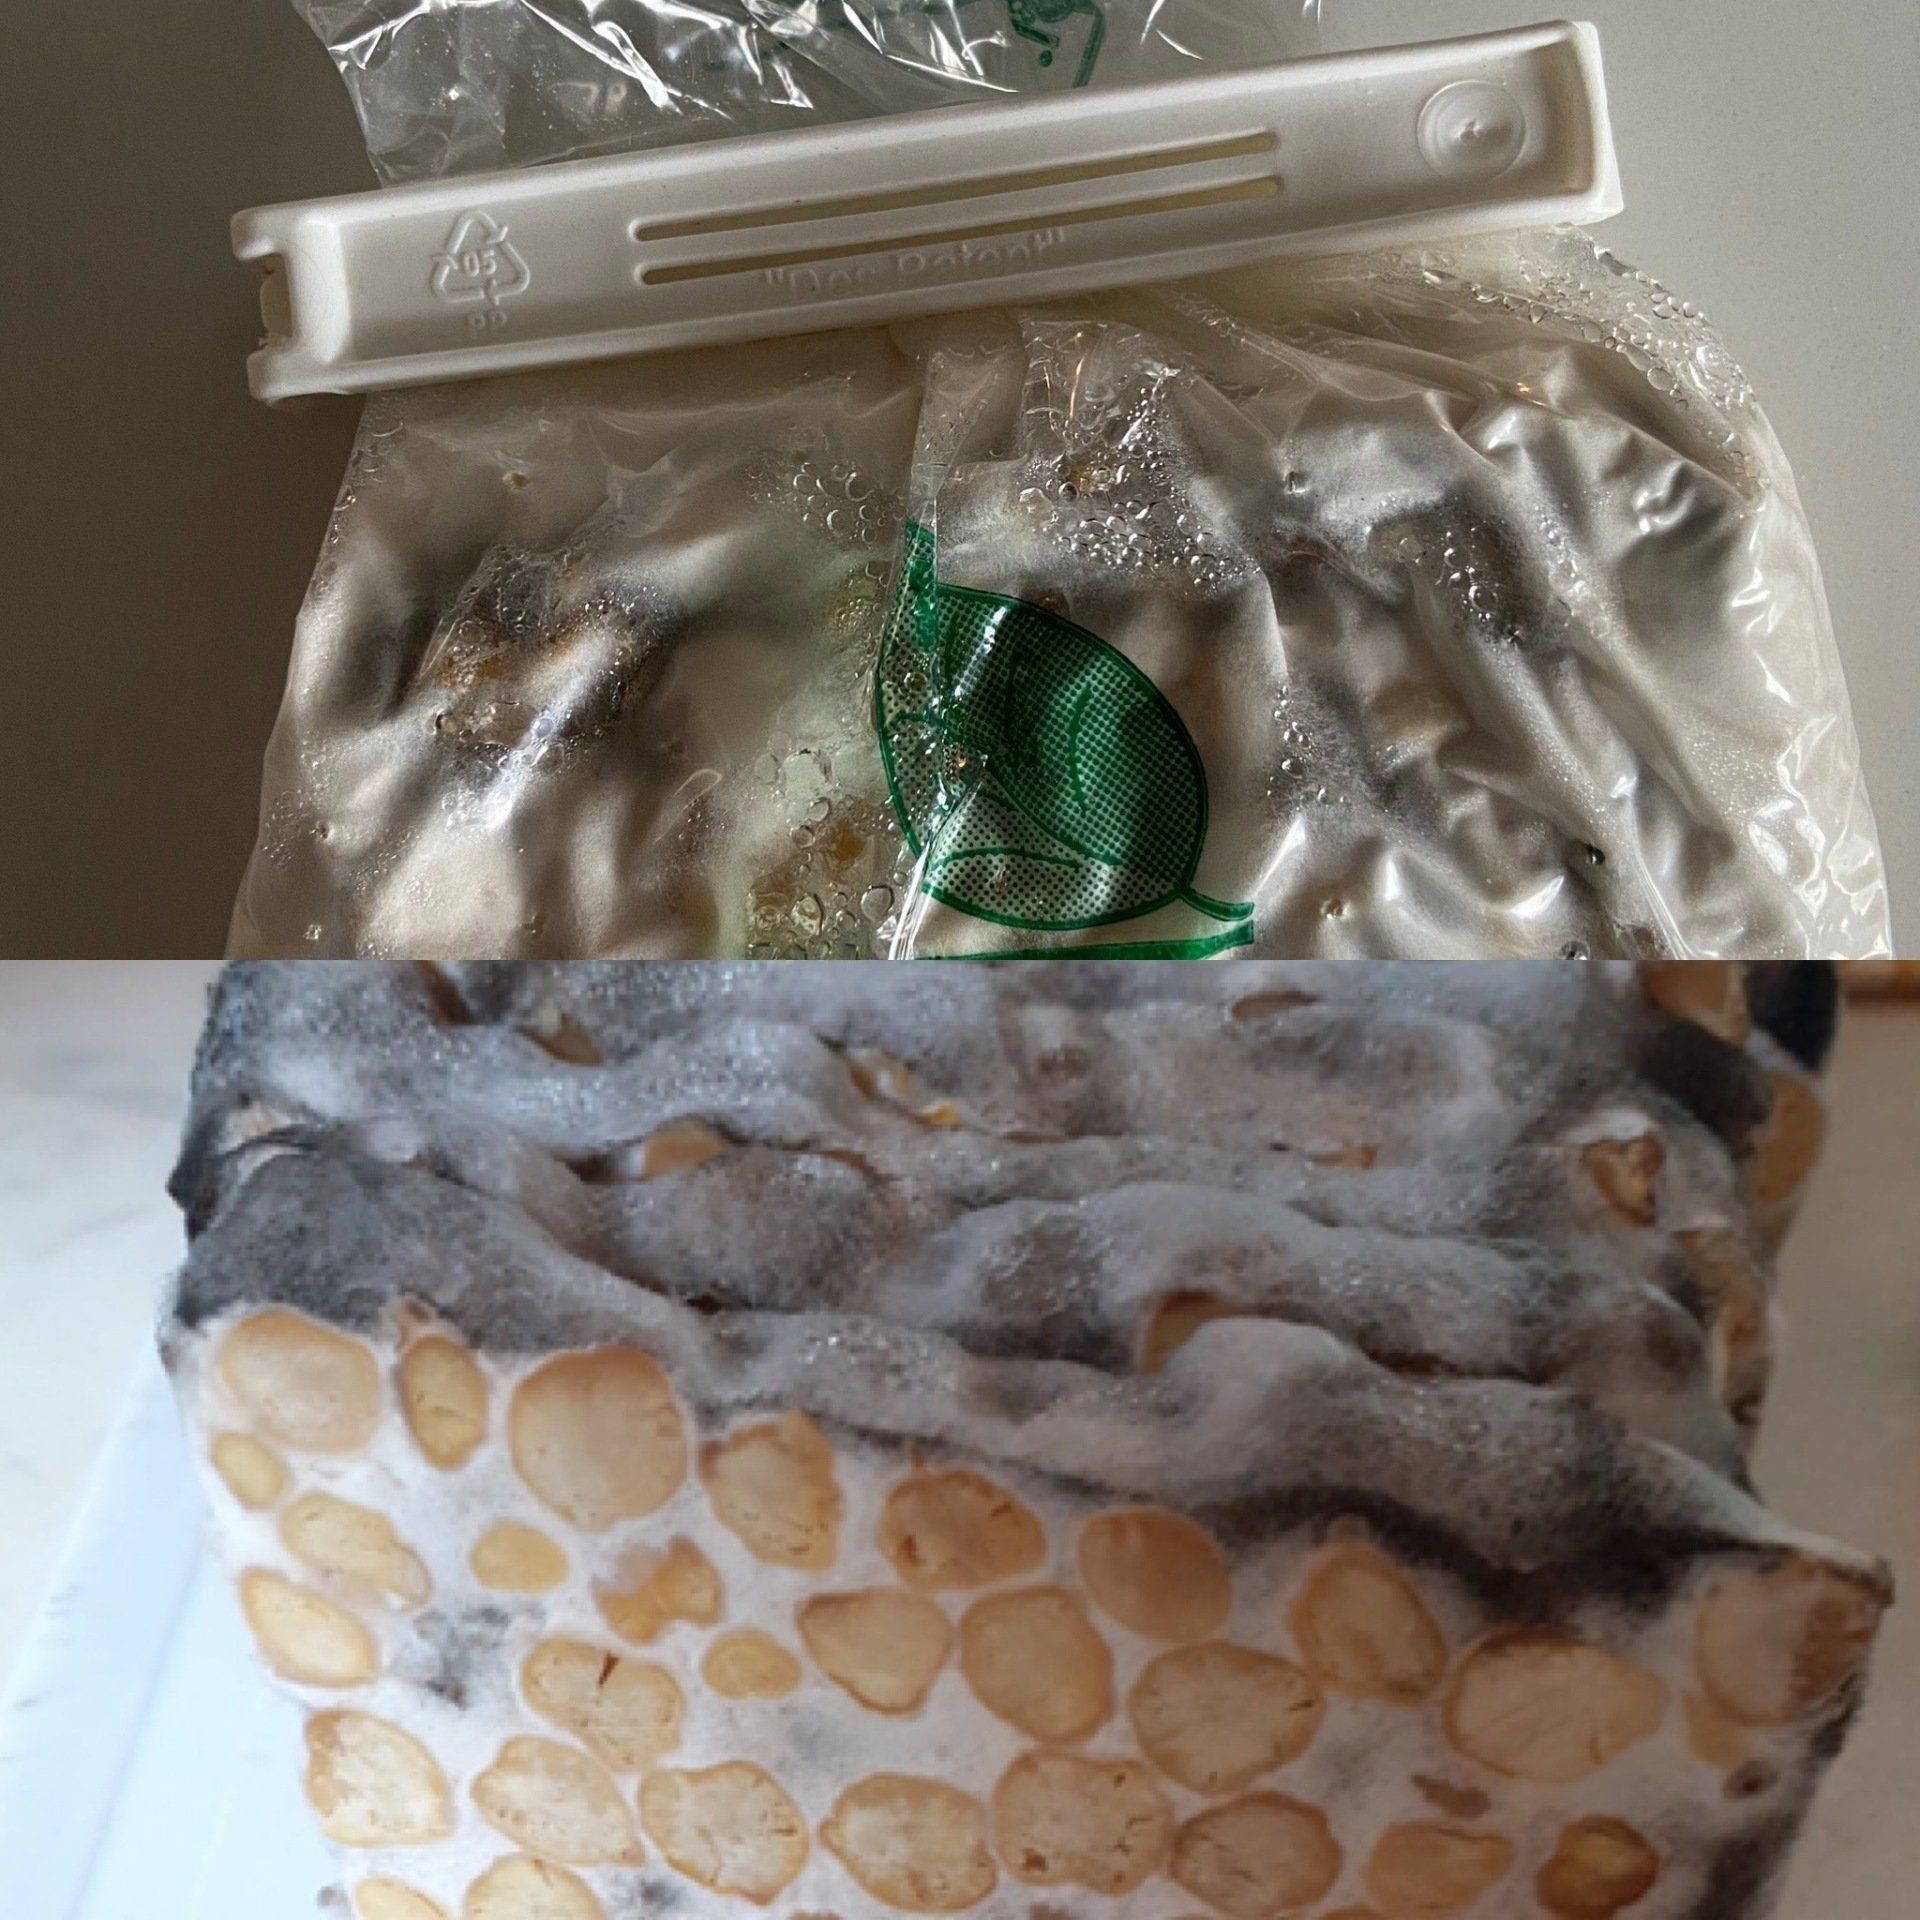
We thank y ou for visiting our website and this page is certainly popular. We have added new photos to answer most of your questions . We have received so many questions from our customers who worry about grey/black spots on their tempeh. Some people think these spores means that the tempeh has failed. Please relax, this is not a failure! Grey/black spots are completely normal and safe to eat. It is not a spoilage and it doesn't mean your tempeh has failed. These spores can mean two things (1) the fermentation process is complete OR (2) during fermentation process there was some excess oxygen resulting in the Oligosporus spores maturing slightly earlier than usual. The perfect tempeh should smell of mushrooms and nothing else. We have pictures of some of our customers photos above. They are perfectly fine and I therefore suggest that they start marinading/cooking! Tempeh is not edible when it has colours other than white or grey/black. Also do not eat tempeh that has a strong smell of ammonia or if the texture of the sliced tempeh is slimy and mushy (indicating that the incubation temperature was too high). We uploaded those failed ones below.
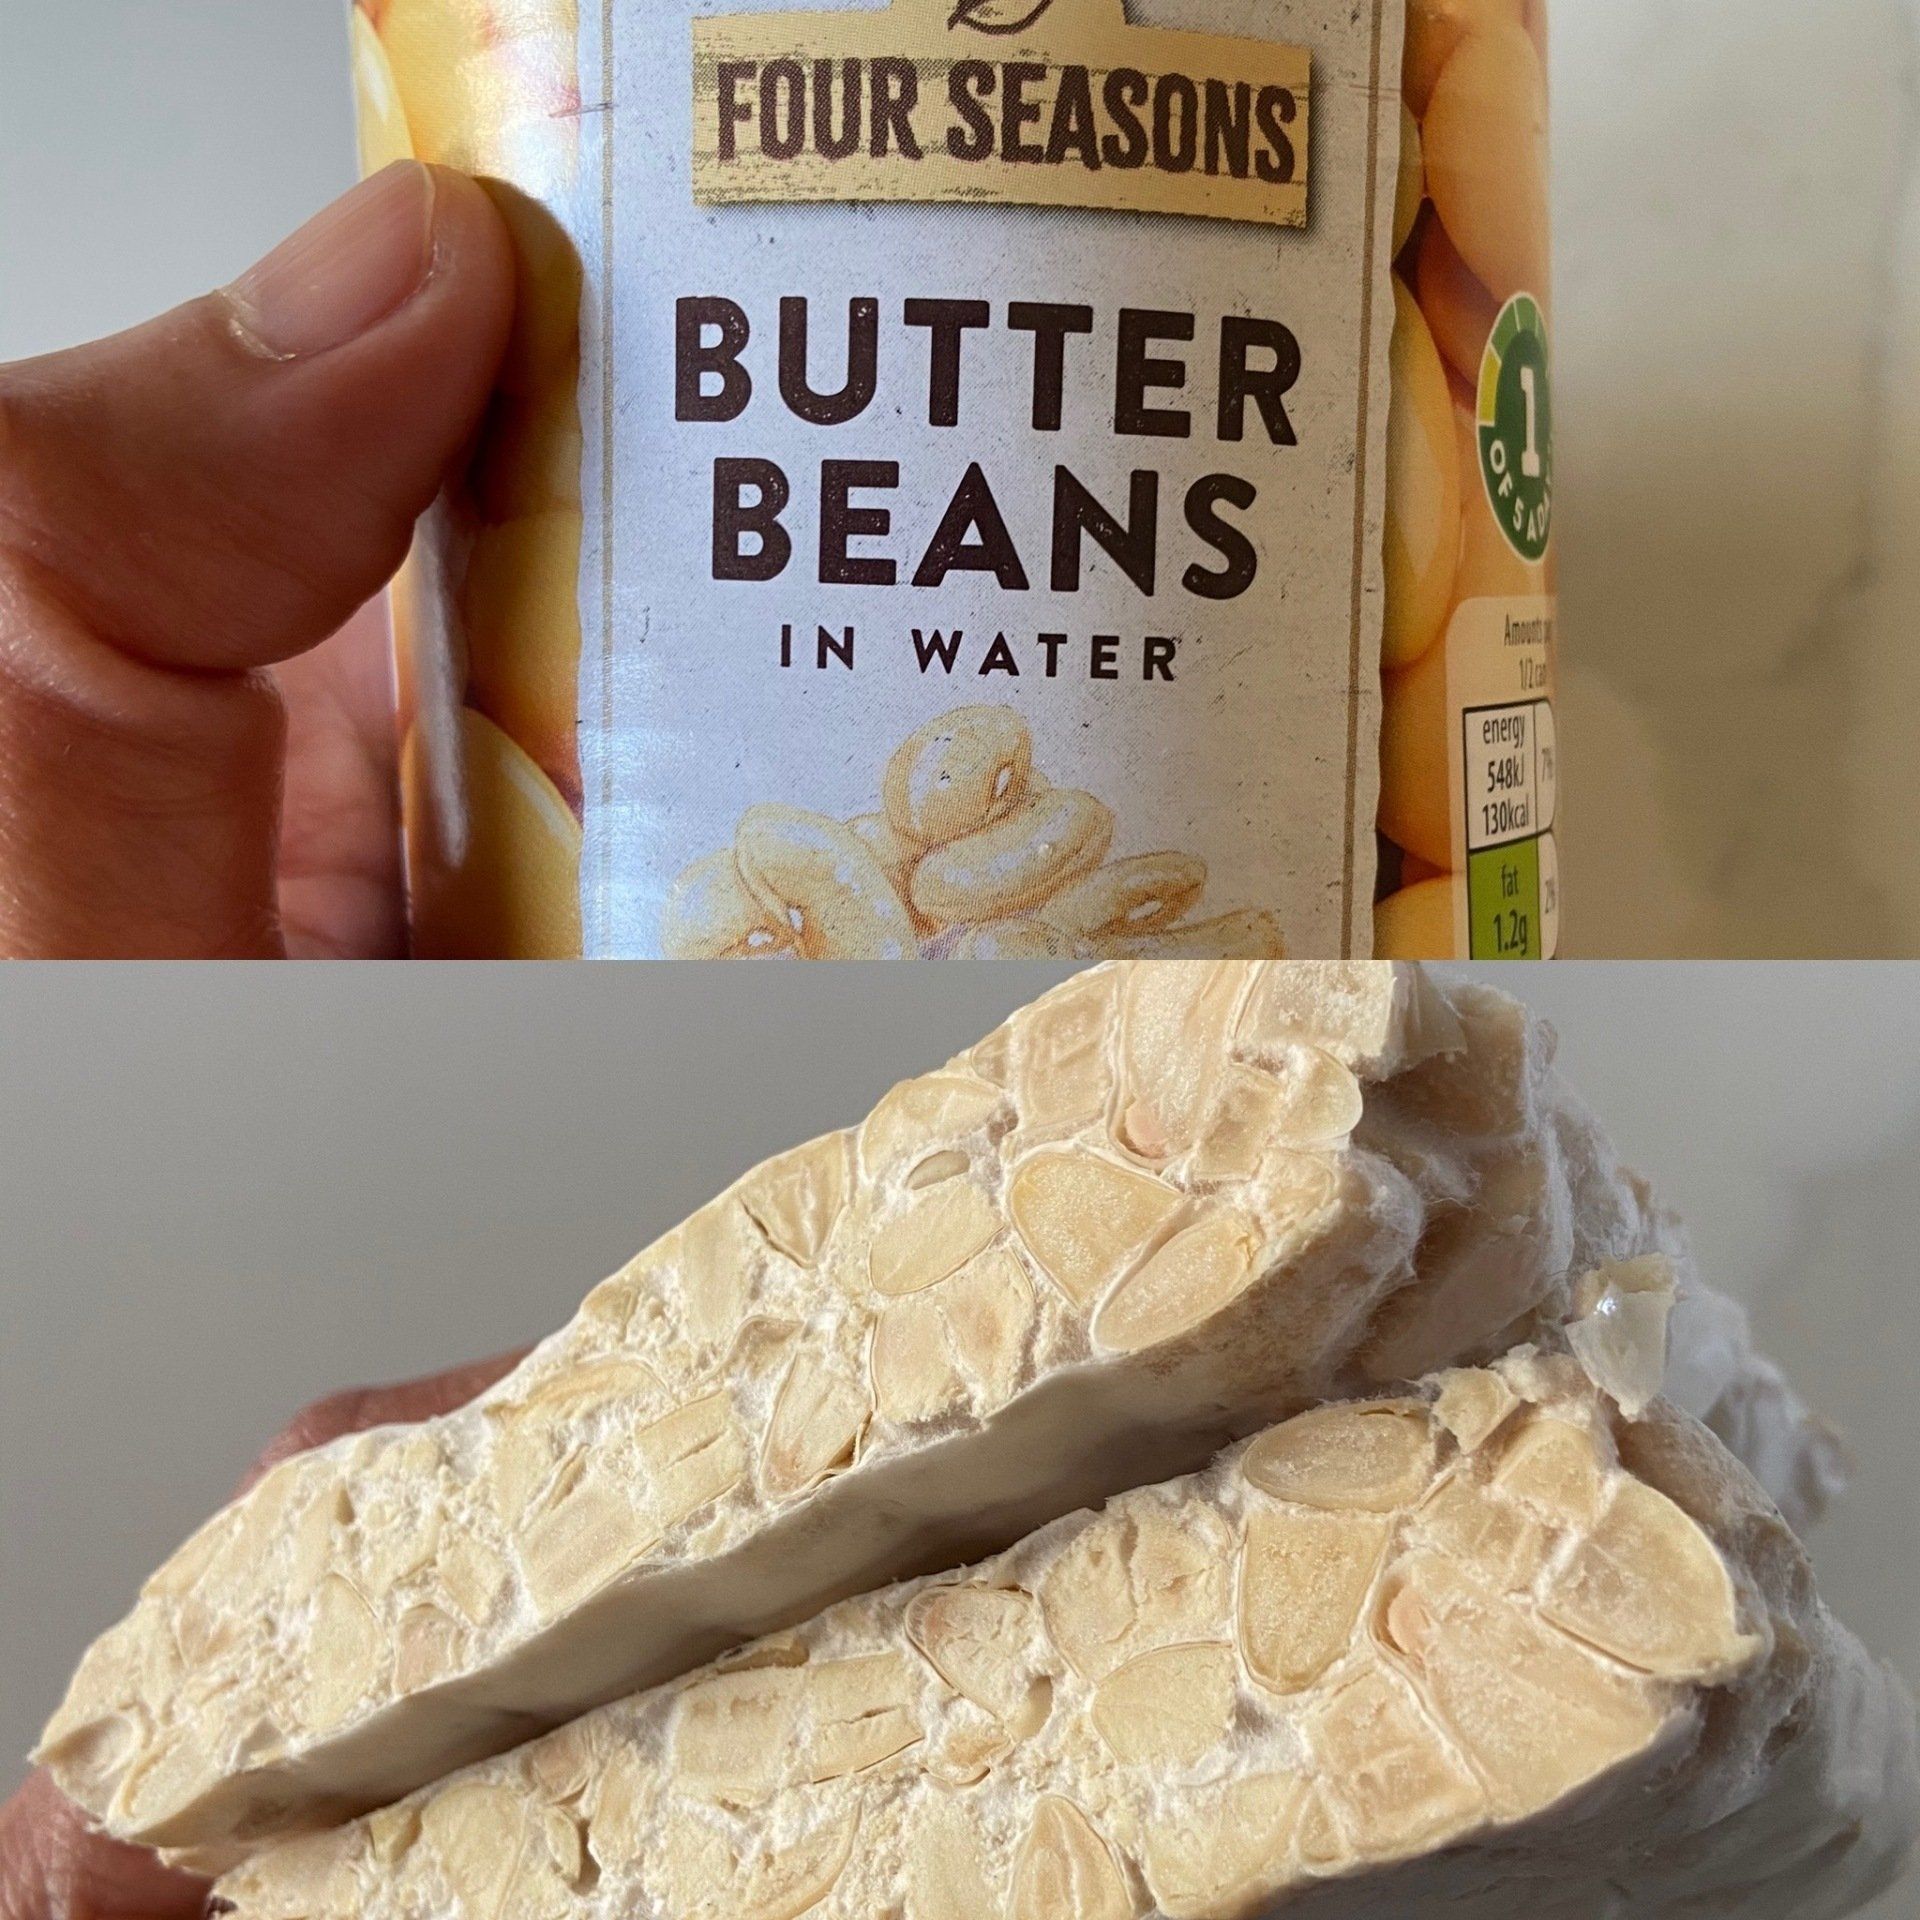
PLEASE NOTE: this tutorial is for colder countries where the temperature in your house is no more than 22C. If your room temperature is above 25C there is no need to cover the beans with tea towels or an electric blanket. Just leave the batch in a safe place. So here is my tutorial to make tempeh using the notoriously difficult butter beans. I had a question from Cris Literatura in the Tempehtation Support Group about it and thought that I must solve this problem. After drying using a dehydrator, the secret to make butter beans tempeh to work is to cut/slice the beans to smaller pieces so that the spores can pierce through the kernels. This method should work with cannellini beans as well. The total weight of the beans after drying was around 184 grams. Instinctively I use 1 teaspoon of starter for two reasons: Firstly, butter bean kernels are larger than other beans. Secondly, the ingredients on the tin included salt and sugar and this means that the fermentation process will take even longer. Thankfully 1 teaspoon of starter worked well. But I do recommend to use 2 teaspoons of starter just to be safe. The fermentation only took 2 days. I set the incubator at 30C for 21 hours and then switched it off after the beans temperature had risen to 34C. The end result was so worth it. This is much better any shop bought tempeh you have ever tasted. Please follow the step by step process below: Equipment required: A large strainer A dehydrator to dry the beans at 40C for 1 hour or an electric fan (takes 2-3 hours) Plastic ziplock bags or biodegradable ones A clean satay stick to make holes in the bag (or a large clean needle) - sanitise by soaking in boiling water and leaving to dry for 1 hour A clean cookie tray/oven tray Clean scissors or a knife An incubator (essential for autumn - winter use), or a clean blanket in the summer (incubator isn't needed when its warm) Ingredients: 1 tin of butter beans 2 tablespoons of white vinegar, apple cider vinegar or juice of a lemon 1 teaspoon of rice flour 1 teaspoon of Tempehtation starter Step by step process:
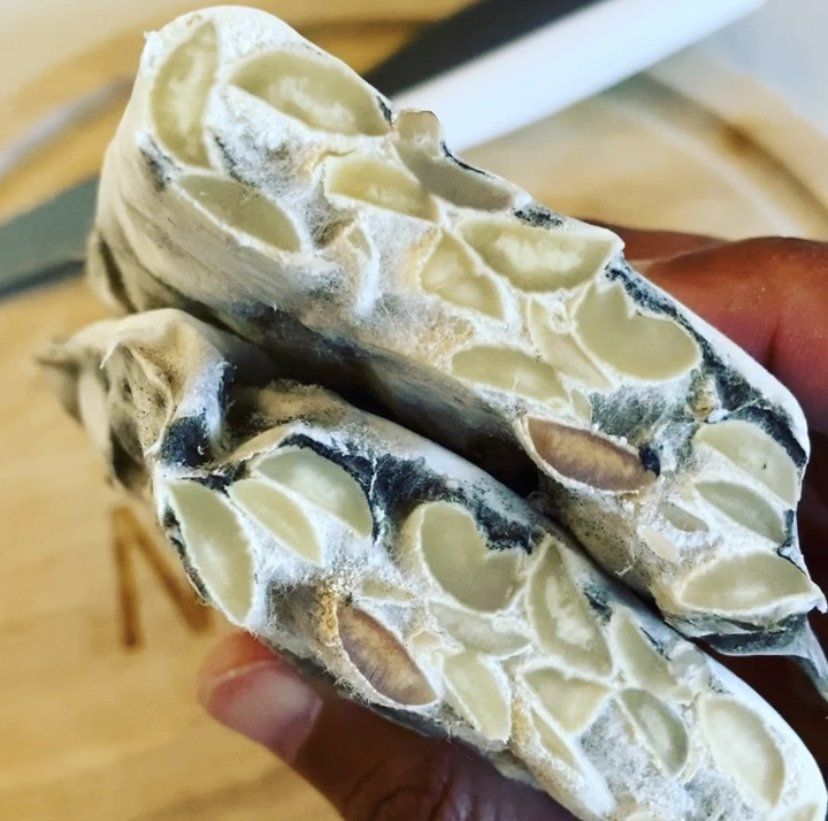
PLEASE NOTE: this tutorial is for colder countries where the temperature in your house is no more than 22C. If your room temperature is above 25C, there is no need to cover the beans with tea towels or an electric blanket. Just leave the batch in a safe place. My family loved this tempeh, which I made using almonds. I marinated the finished tempeh in a BBQ sauce before grilling and it was delicious. As the texture is nutty I am sure it would be possible to make tasty sweet sweet snacks out of this. Be creative! Ingredients: 200 grams of raw almonds 2 tablespoons of 5% acidity white vinegar, apple cider vinegar or juice of a lemon 2 grams of Tempehtation starter (please use the tempeh starter according to the instructions on the label) Clean tap water Equipment required: A large pot to boil the almonds or an Instant Pot A large strainer A dehydrator to dry the beans or a n electric fan plus some tea towels A satay stick to make holes in the plastic bag (or a large needle if you have one). Sanitise the stick or needle by pouring hot boiling water on it and leaving to dry for 1 hour Plastic zip lock bags (these can be reused) or biodegradable plastic bags A blanket or tea towels to keep the tempeh warm An incubator of your choice (check our DIY incubator page for inspiration). Step by step: Soak the almonds overnight The next morning, rinse the almonds until the water runs clear under the tap Cook for 25-30 minutes. I use an Instant Pot Strain off the water and leave to cool Transfer to a plate, remove the skins and split the almonds in two by squeezing them Sprinkle on the vinegar Dry the almonds using a dehydrator. Spread them out and make sure they are not on top of each other. Set at 40 C for 30 minutes. Alternatively spread them out on tea towels and use an electric fan for around 1.5 hours If using the fan, after 1 hour check the almonds. If they are still moist to the touch, dry for a little longer. It is essential that there is no more surface moisture on the beans Once you are confident that the almonds are dry to touch, transfer to a clean bowl Add 1 teaspoon of rice flour and mix through. The purpose of rice flour is to absorb any excess moisture that might still exist on the surface of the beans Add 1 teaspoon of Tempehtation starter and mix thoroughly Transfer to a ziplock bag or use a container. Check the ideas here Pierce both sides of the bag with a clean satay stick or needle Place the bag on an airy tray as shown in the video. Air circulation is crucial. Flatten the bag and make sure that every corner is filled to stop early black spores forming. Make sure that the batch is no more than 2.5 cm thick as this will help to speed up the fermentation Check the temperature in the room. In the summer when the temperature around 24C, the only thing needed to help the fermentation is a clean blanket or several tea towels. An incubator is not required Leave the bag in a safe place and check again in 10 hours When condensation is visible, remove the blanket/tea towels. Leave the batch to ferment on its own Check again in 24 hours. If the spores are visible that's a great sign. Leave for another day The tempeh is ready when the whole batch can be lifted in one piece and is covered in white spores. The tempeh texture will be firm, taste nutty but will have no aroma. Please note that this batch has some black spores forming. This is normal so do not worry. Black spores form when there are airy pockets inside the bag that are not filled with beans. This is due to excess oxygen inside the bag. I will create a separate blog to explain this as there have been many questions sent to me on this subject by email and via our social media. Please check the video tutorial below for my step by step instructions. Any questions? We are happy to help. Our email address is on our homepage.

